HP VS80 User Manual
Browse online or download User Manual for Blank data tapes HP VS80. HP vs80 User's Manual
- Page / 90
- Table of contents
- TROUBLESHOOTING
- BOOKMARKS
- Part Number: C9265-90001 1
- Edition 2 1
- September 2002 1
- 1 Installing the Autoloader 7 3
- 2 Operating the Autoloader 23 3
- A Technical Specifications 71 4
- B Customer Support 77 5
- Installing the Autoloader 7
- Installation Overview 8
- SCSI Requirements 9
- Product Overview 10
- 1 68-pin SCSI connectors 11
- 2 Fan vent 11
- 3 Power connector 11
- Choosing a Location 12
- Unpacking the Autoloader 13
- Accessories 14
- Mounting Brackets 15
- Screws and clip nuts 15
- Mounting Rails 15
- Operating the Autoloader 23
- Operator’s Panel Overview 24
- LED Indicators 26
- Using Cartridges 29
- Importing Cartridges 30
- Exporting Cartridges 31
- Loading Cartridges 32
- Unloading Cartridges 33
- Maintaining Cartridges 35
- Cleaning the Tape Drive 36
- Autoloader Administration 39
- Configuring the Autoloader 40
- Changing the SCSI ID 41
- Random Mode 42
- Sequential Mode 42
- Updating Firmware 45
- Using a Firmware Upgrade Tape 46
- Cycle Count 49
- View Event Log 49
- Firmware Revision 50
- Diagnostics and 51
- Troubleshooting 51
- ■ SCSI ID: 53
- ■ SCSI Cabling: 53
- ■ Termination: 53
- ■ Compatibility: 54
- ■ Device Driver Installation: 54
- Tape movement 55
- Autoloader performance 58
- Cleaning 59
- Media Compatibility 59
- Media Attention LED Issues 60
- Removing Stuck Cartridges 62
- Autoloader Error Codes 66
- Technical Specifications 71
- Autoloader Specifications 72
- Environmental Specifications 73
- Tape Drive Specifications 74
- Media Specifications 75
- Customer Support 77
- Registering Your Product 78
- Service Options 79
- Backup Software Support 81
- HP Telephone Support 81
- Elsewhere 84
- Warranty Information 85
Summary of Contents
user’s guidehp StorageWorksvs80 1/8 autoloader Part Number: C9265-90001Edition 2September 2002© 2002 Hewlett-Packard Company
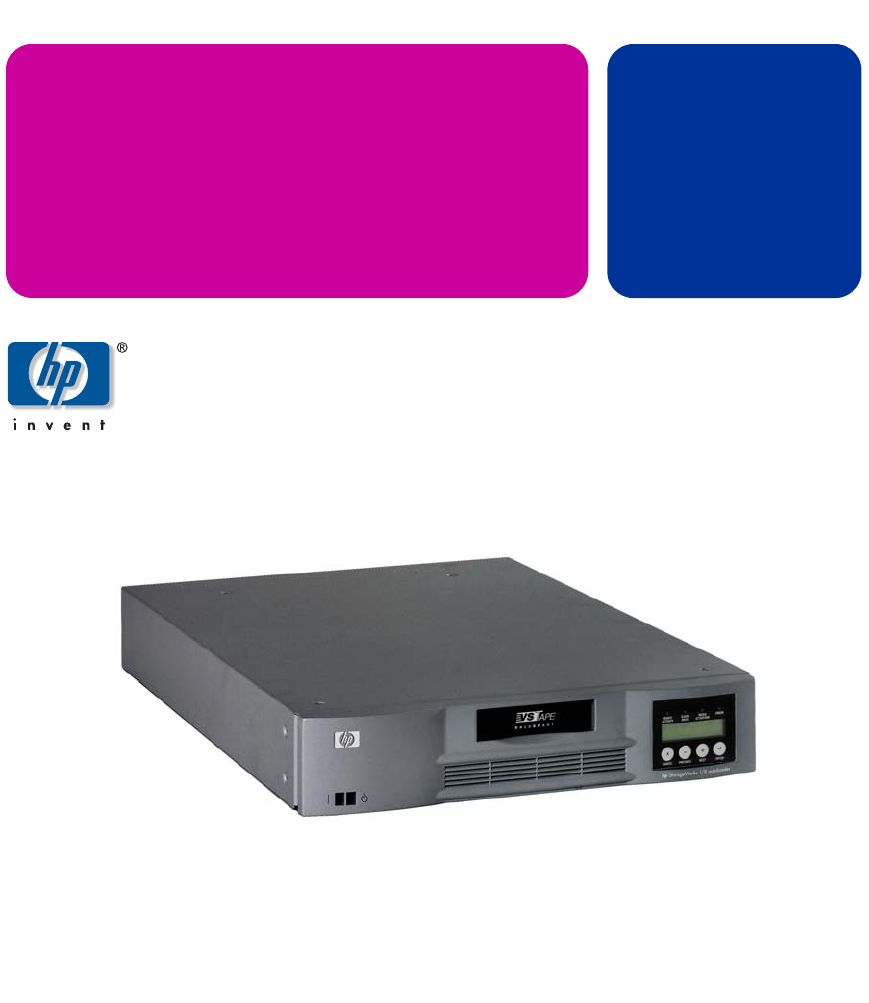
10 Installing the Autoloader Chapter 1Product OverviewFigure 1 Front Panel Controls1 Power switch (recessed)2 Mailslot3 Front panel LEDs4 Front pane
Chapter 1 Installing the Autoloader 11Figure 2 Rear Panel Overview1 68-pin SCSI connectors2 Fan vent3 Power connector
12 Installing the Autoloader Chapter 1Choosing a LocationChoose a location that meets the following criteria (see Technical Specifications on page 71
Chapter 1 Installing the Autoloader 13Unpacking the AutoloaderBefore you begin, clear a desk or table so that you can unpack the autoloader. You also
14 Installing the Autoloader Chapter 1Identifying Product ComponentsAccessoriesFigure 3 Accessories1 SCSI Cable2 SCSI Terminator3 Power Cable4 ISV a
Chapter 1 Installing the Autoloader 15Rack Kit Components (if rackmount unit)Figure 4 Rack Kit ComponentsMounting BracketsScrews and clip nutsMounti
16 Installing the Autoloader Chapter 1Installing the Autoloader into a RackThe autoloader fits all standard 19-inch racks, taking up 2U of space. To i
Chapter 1 Installing the Autoloader 173. Using the screws and clip nuts from the rackmount hardware package, secure one rail to each side of the rack
18 Installing the Autoloader Chapter 14. Slide the autoloader onto the rails and secure the mounting bracket to the rack using the screws and clip nu
Chapter 1 Installing the Autoloader 19Connecting the SCSI and Power CablesTo connect the SCSI and power cables to the autoloader, follow these steps:1
2 Notice hp StorageWorks vs80 1/8 autoloaderNoticeThis document contains information that is protected by copyright. All rights are reserved. No part
20 Installing the Autoloader Chapter 14. Attach the terminator to the remaining SCSI connector on the rear panel of the autoloader (if the autoloader
Chapter 1 Installing the Autoloader 21Preparing the Host and Verifying the ConnectionIf necessary, install a SCSI host adapter, software, and compatib
22 Installing the Autoloader Chapter 1 Verify the connection between the autoloader and host by:— Installing the HP Library & Tape Tools diagnost
Chapter 2 Operating the Autoloader 23Operating the AutoloaderChapter OverviewThis chapter describes the following: Operator’s Panel Overview on page
24 Operating the Autoloader Chapter 2Operator’s Panel OverviewThe Operator's Panel consists of four LEDs, four buttons, and a 2-line by 16-charac
Chapter 2 Operating the Autoloader 25Exporting the indicated cartridge will clear the error condition. See Exporting Cartridges on page 31. If these s
26 Operating the Autoloader Chapter 2LED IndicatorsThe Operator's Panel includes four LED indicators that provide a variety of information as det
Chapter 2 Operating the Autoloader 27Operator’s Panel Control ButtonsThe Operator’s Panel includes four buttons that provide access to all operations
28 Operating the Autoloader Chapter 2Understanding the Menu StructureFigure 11 Operator’s Panel Menu Structure
Chapter 2 Operating the Autoloader 29Using CartridgesBefore you use the autoloader, make sure you observe these general rules: Use only DLTtape IV ca
hp StorageWorks vs80 1/8 autoloader 3Notice 2Typographical Conventions and Terms 2In This Manual 2Revision History 2Updates 21 Installing the Autoload
30 Operating the Autoloader Chapter 2Importing CartridgesCaution Performing an import or export of media during a data backup may result in adverse re
Chapter 2 Operating the Autoloader 31Figure 12 Importing a CartridgeExporting CartridgesCaution Performing an import or export of media during a dat
32 Operating the Autoloader Chapter 2Figure 13 Exporting a CartridgeLoading CartridgesThis option loads a cartridge from the autoloader carousel int
Chapter 2 Operating the Autoloader 33Unloading CartridgesThis option unloads the cartridge from the tape drive into its original slot. To use this opt
34 Operating the Autoloader Chapter 2Write-Protecting CartridgesAll cartridges have a write-protect switch to prevent accidental erasure of data. Befo
Chapter 2 Operating the Autoloader 35Maintaining CartridgesTo ensure the longest possible life for all of your DLTtape IV cartridges, follow these gui
36 Operating the Autoloader Chapter 2Cleaning the Tape DriveWhen the Clean Drive LED is on, the autoloader's tape drive needs to be cleaned. An i
Chapter 2 Operating the Autoloader 37To clean the tape drive, follow these steps:1. From the Home Screen or main menu, press the [+] or [-] button un
38 Operating the Autoloader Chapter 2Creating an Inventory of CartridgesThis option will build a new inventory of cartridges in the autoloader. To use
Chapter 3 Autoloader Administration 39Autoloader AdministrationChapter OverviewThis chapter describes the following: Configuring the Autoloader on p
4 hp StorageWorks vs80 1/8 autoloaderImporting Cartridges 30Exporting Cartridges 31Loading Cartridges 32Unloading Cartridges 33Write-Protecting Cartri
40 Autoloader Administration Chapter 3Configuring the AutoloaderThe Configuration menu provides access to the following autoloader configuration optio
Chapter 3 Autoloader Administration 41Changing the SCSI IDThis option changes the SCSI ID the autoloader uses. The autoloader operates as a single SCS
42 Autoloader Administration Chapter 3Setting the Autoloader Operating ModeThe autoloader operating mode is determined by whether or not you are using
Chapter 3 Autoloader Administration 43Circular ModeNote Circular mode is only applicable when the autoloader is in Sequential mode.This option turns C
44 Autoloader Administration Chapter 3Autoload ModeNote Autoload mode is only applicable if the autoloader is in Sequential mode.This option turns Aut
Chapter 3 Autoloader Administration 45Updating FirmwareCaution Do not power cycle or reset the autoloader during the upgrade process. Doing so could c
46 Autoloader Administration Chapter 3Using a Firmware Upgrade TapeNote The preferred method to update firmware is by using HP Library & Tape Tool
Chapter 3 Autoloader Administration 47Note If the cartridge is not a valid code update cartridge, the LCD will temporarily display error code “BC,” th
48 Autoloader Administration Chapter 3Running the Autoloader System TestCaution Running the system test for extended periods of time will reduce the l
Chapter 3 Autoloader Administration 49Retrieving Information About the AutoloaderThe Information menu provides access to information about the autoloa
hp StorageWorks vs80 1/8 autoloader 5Autoloader Specifications 72Environmental Specifications 73Tape Drive Specifications 74Media Specifications 75B C
50 Autoloader Administration Chapter 3Note Errors will show as “X X YY”. “YY” represents the specific error code, and “X X” represents non pertinent a
Chapter 4 Diagnostics and Troubleshooting 51Diagnostics and TroubleshootingChapter OverviewThis chapter describes the following: Using HP Library &am
52 Diagnostics and Troubleshooting Chapter 4Using HP Library & Tape Tools to Diagnose ProblemsWith HP Library & Tape Tools installed on the ho
Chapter 4 Diagnostics and Troubleshooting 53Troubleshooting Installation ProblemsProblems encountered during the installation of the autoloader are us
54 Diagnostics and Troubleshooting Chapter 4To terminate the autoloader, locate the terminator in the accessories package and press it firmly into eit
Chapter 4 Diagnostics and Troubleshooting 55Troubleshooting Common ProblemsThis section includes information on troubleshooting common autoloader prob
56 Diagnostics and Troubleshooting Chapter 4Tape stuck in drive. Power cycle the autoloader, allow it to complete initialization (may take as long a
Chapter 4 Diagnostics and Troubleshooting 57Cannot write to or read from tape. Make sure that the cartridge is write enabled (move the write-protect
58 Diagnostics and Troubleshooting Chapter 4SCSI IDChanged drive SCSI ID, but the host server does not recognize the new ID. Make sure that all SCSI
Chapter 4 Diagnostics and Troubleshooting 59CleaningRecurring cleaning message or media attention light. Make sure you are using a DLT vs80 compatibl
6 hp StorageWorks vs80 1/8 autoloader
60 Diagnostics and Troubleshooting Chapter 4Media is rejected by the tape drive. Restore from tape NOT successful. You attempted to load media with a
Chapter 4 Diagnostics and Troubleshooting 61Bad/defective/contaminated media If the Media Attention LED is cleared using a cleaning cartridge and the
62 Diagnostics and Troubleshooting Chapter 4Removing Stuck CartridgesIf the autoloader experiences a severe mechanical problem or if you need to remov
Chapter 4 Diagnostics and Troubleshooting 635. Loosen the autoloader cover by removing the five screws on the back of the autoloader, and the screws
64 Diagnostics and Troubleshooting Chapter 47. Remove the cartridge carrier that contains the tape you want to remove by lifting the carrier up and o
Chapter 4 Diagnostics and Troubleshooting 659. After removing the cartridges from the desired carriers, reinstall each carrier on the autoloader belt
66 Diagnostics and Troubleshooting Chapter 4Autoloader Error CodesIf an error occurs during operation of the autoloader, the autoloader stops the curr
Chapter 4 Diagnostics and Troubleshooting 673 0 83 Inventory not valid. The cartridge inventory is not valid because of manual changes or previous fat
68 Diagnostics and Troubleshooting Chapter 43 0 94 Cartridge unload error. A failure occurred while trying to unload a cartridge from the drive to its
Chapter 4 Diagnostics and Troubleshooting 693 0 B1 RAM error. Cycle power on the autoloader and attempt the operation again. If the error recurs, cont
Chapter 1 Installing the Autoloader 7Installing the AutoloaderChapter OverviewThis chapter describes the following: Installation Overview on page 8
70 Diagnostics and Troubleshooting Chapter 4
Appendix A Appendix Overview 71Technical SpecificationsAppendix OverviewThis appendix describes the following: Autoloader Specifications on page 72
72 Autoloader Specifications Appendix AAutoloader SpecificationsTable 6 Autoloader SpecificationsCharacteristic SpecificationHeightPackagedUnpackage
Appendix A Environmental Specifications 73Environmental SpecificationsTable 7 Environmental SpecificationsCharacteristic SpecificationTemperature/hu
74 Tape Drive Specifications Appendix ATape Drive SpecificationsTable 8 DLT vs80 Drive SpecificationsDescription DLT1 (vs80)Read/write transfer rate
Appendix A Media Specifications 75Media SpecificationsTable 9 Media SpecificationsCharacteristic DLT Type IV MediaDLT1 formatted capacity 40 GB (non
76 Media Specifications Appendix A
Appendix B Appendix Overview 77Customer SupportAppendix OverviewThis appendix describes the following: Registering Your Product on page 78 Service O
78 Registering Your Product Appendix BRegistering Your ProductRegistering your product ensures fast and easy access to Hewlett-Packard Customer Suppo
Appendix B Service Options 79Service OptionsHP service options upgrade the warranty on your tape autoloader. A wide range of warranty options are avai
8 Installing the Autoloader Chapter 1Installation OverviewInstalling the autoloader consists of the following steps, which are explained in more detai
80 Contacting HP Customer Support Appendix BContacting HP Customer SupportIf your autoloader fails during the warranty period and the suggestions in
Appendix B Contacting HP Customer Support 81Backup Software SupportWhile the autoloader product itself is supported by Hewlett-Packard, all software p
82 Contacting HP Customer Support Appendix B United States (970) 635-1500; Monday - Friday, 7 am - 5pm Mountain Time Venezuela800 47 888 (Caracas 2
Appendix B Contacting HP Customer Support 83 Netherlands+ 31 (0) 20 606 8751 Norway+ 47 22 11 6299 Portugal+ 351 (0)1 318 00 65 Spain+ 34 902 321
84 Contacting HP Customer Support Appendix B Korea+ 82 2 3270 0700 Outside Seoul 080 999 0700 Malaysia+ 60 3 295 2566 New Zealand+ 64 9 356 6640
Appendix B Warranty Information 85Warranty InformationHP Products: HP StorageWorks vs80 1/8 AutoloaderDuration of limited warranty: One year1. HP war
86 Warranty Information Appendix BTO THE EXTENT ALLOWED BY LOCAL LAW, THE REMEDIES IN THIS WARRANTY STATEMENT ARE THE CUSTOMER’S SOLE AND EXCLUSIVE R
87Aaccessories 14altitude specifications 73Asia-Pacific telephone support83autoloaderregistration 78autoloader accessories 14autoloader installati
88Iimporting cartridges 30informationcycle count 49event log 49warranty 2information, gathered beforecontacting support 80installationcabling 19
89Tape Tools 21, 45tapes 29stuck 62temperature and humidity spec-ifications 73testsystem 48troubleshooting 53troubleshooting table 55typograph
Chapter 1 Installing the Autoloader 9Understanding Autoloader FeaturesThe autoloader is a SCSI-2 Low-Voltage Differential (LVD) data storage device th
90
Related products and manuals for Blank data tapes HP VS80
 (14 pages)
(180 pages)
(14 pages)
(180 pages)
© 2020, manymanuals.com. All rights reserved. | 2.561 s |
 Manymanuals.com
 Manymanuals.de
 Manymanuals.fr
 Manymanuals.it
 Manymanuals.pl
 Manymanuals.cz
 Manymanuals.es
 Manymanuals-pt.com
Comments to this Manuals